Automated deployments on Skynet
7
0

I have created a web app, where can I deploy it so I can share it with my friends?
I have created a pull request with some changes, how can I verify it with my manager or designer without making them run it locally?
If you are a web developer, you might have asked yourself those questions already. There is a number of services that would help you out with that, for example github pages, netlify, or vercel but with Skynet and thanks to the recent release of the registry API, you can achieve the same goal and at the same time keep your web app decentralized and accessible from any Skynet portal.
This article, in the form of a step by step tutorial, will show you how to:
- automatically build and deploy your web application to a unique URL on every pull request change
- automatically build and deploy your web application on any change to the production branch and update your application public URL
After reading this post, you will be able to accomplish these things with just a single configuration file and some handshake domain setup.
You will find a live usage example in the final section of this article.
Automation workflow setup
This article assumes you already have a web application that has its source code hosted on Github. In this example, we will be using a demo web app created with Create React App. You can do the same or use your existing web app.
We’ll use Github actions to set up our automation. Just to give you some background, Github actions is a way to compose a continuous integration workflow that executes on free Github runners.
Basic action workflow — test and build
As a first step, we will set up a most basic workflow that will run every time a pull request is opened or updated.
Please create a file in your code source “.github/workflows/deploy.yml” and add the following:
name: Deploy to Skynet
on:
  pull_request:
jobs:
  build:
  runs-on: ubuntu-latest
steps:
  — uses: actions/checkout@v2
  — name: Use Node.js
    uses: actions/setup-node@v1
    with:
      node-version: 14.x
  - name: Install dependencies
    run: npm install
  - name: Run unit tests
    run: npm test
  - name: Build
    run: npm run build
This workflow contains 4 steps:
- it will set up Node 14 environment
- it will install project dependencies with npm install
- it will run unit tests with npm test (optional, only if you have tests — if not you can delete this step)
- it will build a project with npm run build (depending on your configuration you might want to configure this accordingly)
Right now this is all that this action will do.
Testing time!
Create a new branch (please do not commit directly to your production branch, we want to open a pull request), commit and push code changes, and open a pull request on Github.
git checkout -b pull-request-workflow
git add .github/workflows/deploy.yml
git commit -m “initial version of the workflow”
git push — set-upstream origin pull-request-workflow
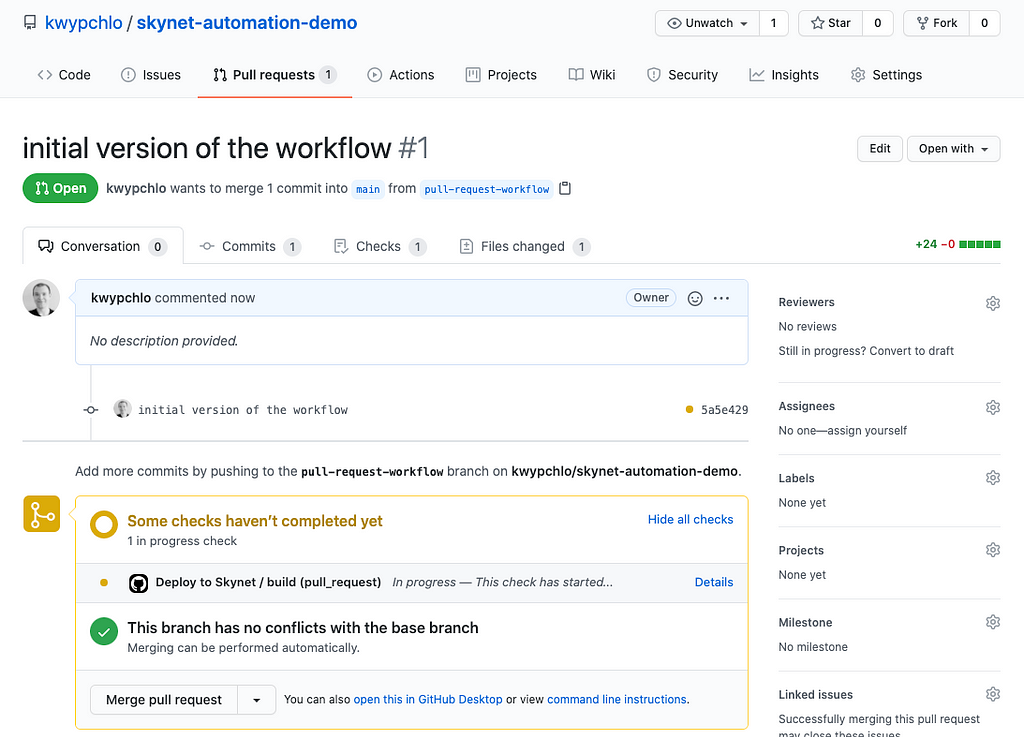
Once you open a pull request you will see that the “Deploy to Skynet” workflow has been started (you might need to refresh the page if it doesn’t show up immediately after creating the pull request). After some time, the orange indicator should change into a green checkmark — this is how we know the workflow has finished successfully.
Configuring Deploy to Skynet action
Now it’s time to add a Deploy to Skynet Github action that will use the artifacts that were built with npm build in the last step of our workflow and deploy to Skynet.
Please edit “.github/workflows/deploy.yml” and append a new step to our setup:
— name: Deploy to Skynet
  uses: kwypchlo/deploy-to-skynet-action@main
  with:
    upload-dir: build
    github-token: ${{ secrets.GITHUB_TOKEN }}
The upload-dir argument points to the directory that npm build populates with the production application build. Depending on your web application framework, you will need to configure the argument accordingly. This example uses Create React App and by default, the production build directory is build.
The github-token argument is populated with a secret GITHUB_TOKEN that Github creates automatically. It is needed for the action to access the Github API so it can create a comment on the pull request with the deployment details on success.
Now, your full “.github/workflows/deploy.yml” will look like this:
name: Deploy to Skynet
on:
  pull_request:
jobs:
  build:
  runs-on: ubuntu-latest
steps:
  — uses: actions/checkout@v2
  — name: Use Node.js
    uses: actions/setup-node@v1
    with:
      node-version: 14.x
  - name: Install dependencies
    run: npm install
  - name: Run unit tests
    run: npm test
  - name: Build
    run: npm run build

  — name: Deploy to Skynet
    uses: kwypchlo/deploy-to-skynet-action@main
    with:
      upload-dir: build
      github-token: ${{ secrets.GITHUB_TOKEN }}
Testing time!
Commit those changes and push the branch.
git add .github/workflows/deploy.yml
git commit -m “configure deploy to skynet action”
git push
This will trigger a new workflow job. After it is finished, you should receive a comment on your pull request that looks like this:
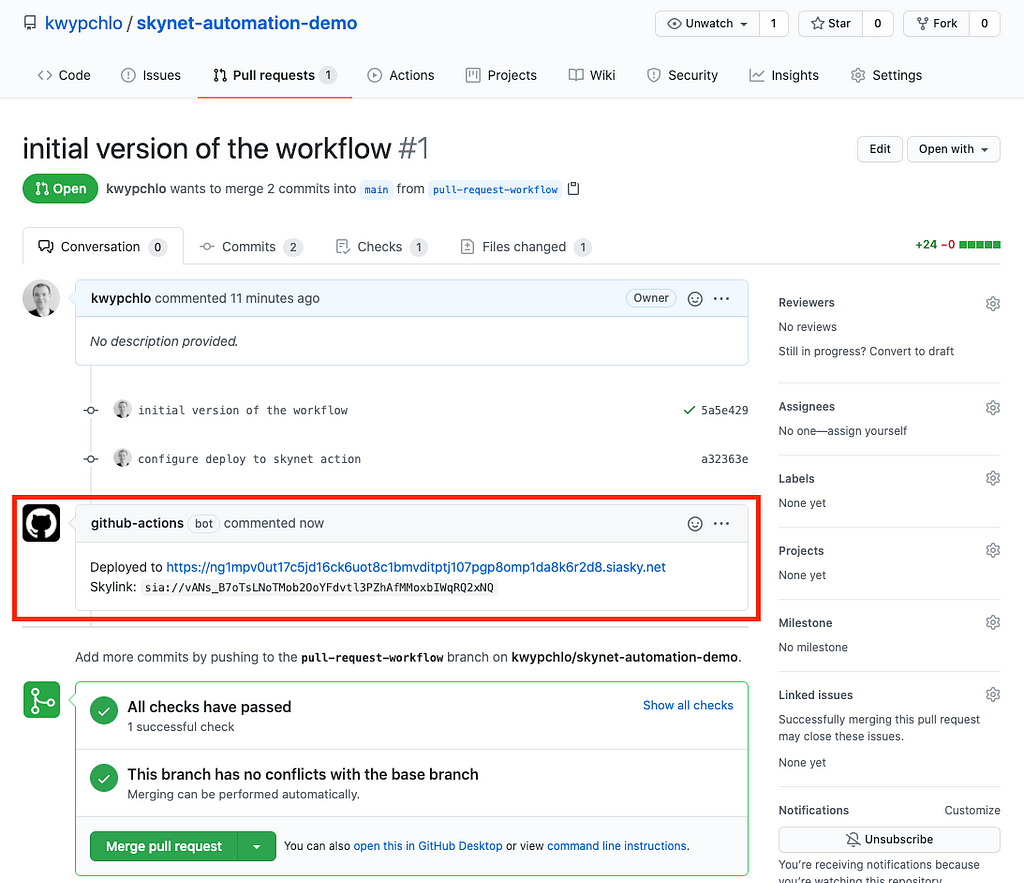
🎉 Congratulations! You have successfully deployed your application to Skynet. It has been built from the specific commit and you can verify that it works by visiting the URL from the comment.
In case something went wrong
If you have not received a comment on your pull request or the link is not working, there are a couple of possible reasons:
- your workflow failed for some reason before reaching the Deploy to Skynet action — please consult the job logs, maybe your unit tests failed or have not been set up correctly (you can delete that step from the workflow if you don’t have any tests)
- your `upload-dir` might be misconfigured — please make sure that the directory name you put in there is the directory that gets populated after running npm build, you can check that by running this locally
- you created a pull request from a fork of the repo to a forked repo — due to Github actions limitations, Github action run on pull requests from forks have read-only access to the Github API and are not allowed to create comments (you should have information about it in job logs if this is the case)
- siasky.net might be acting up, please visit the website and try to upload any file using the web interface — if you experience problems with that, then please report them to us on discord
In any case, you should start by checking the job logs for additional info.
Where are we now in the process?
By now you should have a workflow set up that will run on each new and updated pull request.
What it means is that every time you make some changes and open a pull request, you will be able to verify them straight from the link from a pull request comment. Every time it runs, it will create a new link to the deployment so you will also have access to the previous iterations.
This is very handy for specific purposes, for example, if you want to let the code reviewer verify your changes “live”. You might want to share the link with your project manager to make sure that the changes in the code reflect the requirements.
Deploying production-ready builds on branch update
Up until now, we were building and deploying only within pull requests. You can however configure Github action workflow to also run every time you push anything to the “main” branch (that includes merging pull requests). This way, every time you make a production-ready change in your repository, the workflow will deploy a new version of the app based on the “main” branch.
The only thing we need to change in “.github/workflows/deploy.yml” is the “on” directive that should be extended with:
on:
  pull_request:
  push:
    branches: [main]
Your full “.github/workflows/deploy.yml” file should look like this now:
name: Deploy to Skynet
on:
  pull_request:
  push:
    branches: [main]
jobs:
  build:
  runs-on: ubuntu-latest
steps:
  — uses: actions/checkout@v2
  — name: Use Node.js
    uses: actions/setup-node@v1
    with:
      node-version: 14.x
  - name: Install dependencies
    run: npm install
  - name: Run unit tests
    run: npm test
  - name: Build
    run: npm run build

  — name: Deploy to Skynet
    uses: kwypchlo/deploy-to-skynet-action@main
    with:
      upload-dir: build
      github-token: ${{ secrets.GITHUB_TOKEN }}
Testing time!
Commit those changes and push the branch.
git add .github/workflows/deploy.yml
git commit -m “run workflow on every push to main branch”
git push
We are not expecting anything new in particular right now yet because we are still on a custom branch, within a pull request. We are now ready though to merge the pull request. You can do so from the pull request interface on Github.
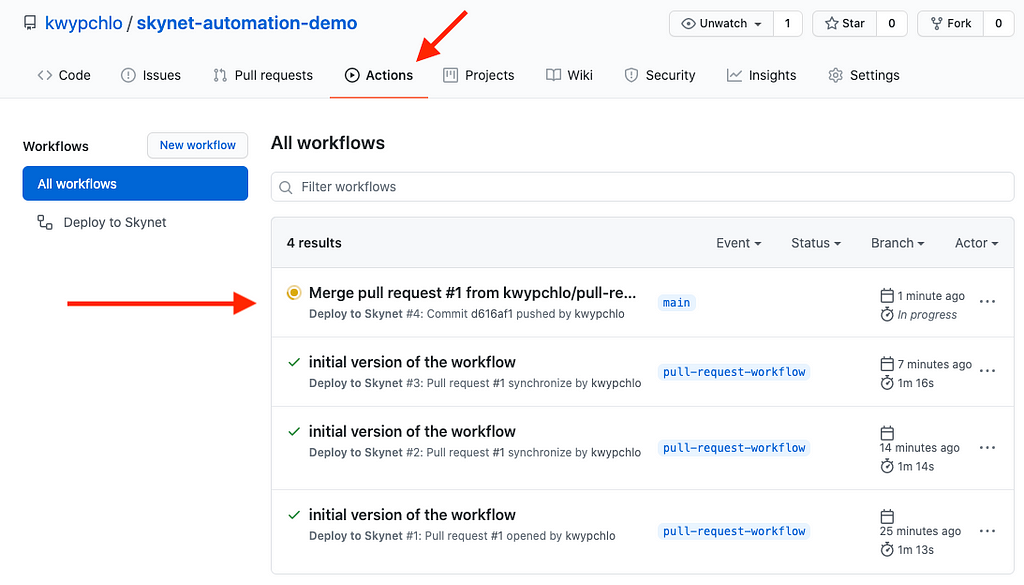
Merging a pull request should trigger a new workflow job. Unfortunately, since there is no pull request context anymore, our Github workflow will not be able to create a comment on the pull request with the deployment details after the job is finished. You will need to go to the “actions” tab manually to see your workflow running.
Once the workflow is finished, click the workflow name and drill down the logs to manually grab the deployment URL.
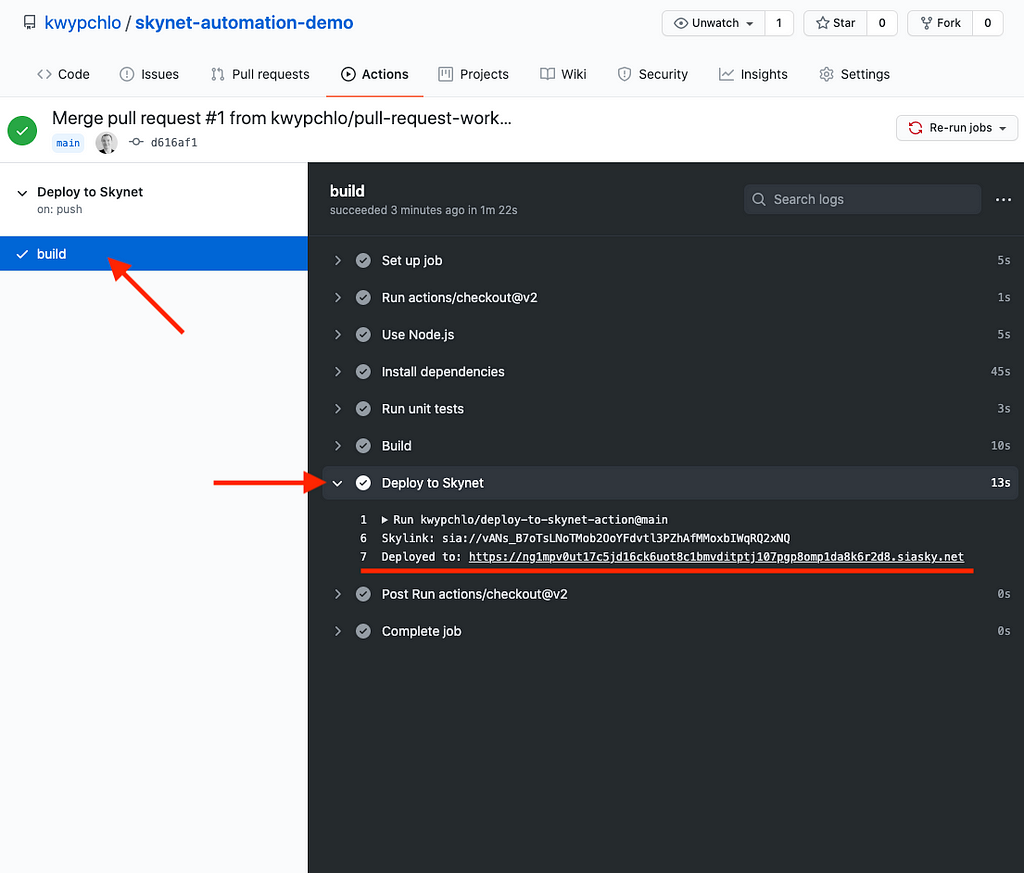
Since that deployment has been created from a “main” branch, we can assume that this is in fact a production, stable release and you can share that link with anyone as such.
Now, every time you push something to the “main” branch, it will build and deploy a new release with a new link. This is far from perfect if you want to update your application often. There is a way to remedy that though, please follow along with the next section.
Using handshake domain for production release
In the Skynet 🤝 Handshake article, we described how to purchase and use a handshake domain to serve Skynet hosted content.
The main idea is, once you own a handshake domain like “my-example-webapp”, every time you deploy a new release, you can manually copy the new deployed release Skylink and update the handshake domain record with the new Skylink. This way, you could share a handshake domain Skynet link like https://my-example-webapp.hns.siasky.net and it would always point your users to the Skylink you have in the record.
This is great if you want to manually choose when you update your production website. If you however want to automate this process further, there is a way to do so!
Learning about Skynet registry
Before we dive into the code, please take a minute to read about the Skynet registry from the section below.
A couple of days ago, Sia released a new decentralized database called SkyDB built on top of a Skynet new registry API.
Skynet registry API allows users to store small pieces of information (like Skylinks) on hosts, secured with a private/public key pair. Only a person owning the private key can modify the corresponding registry entry but everyone who has the public key can access it and it is safe to share the public key since it comes with read-only access. Skynet registry API also requires a “datakey” which is something of an id of the entry — you can read more about the “datakey” in Skynet registry docs.
An example link that reads from the registry could be:
https://siasky.net/skynet/registry?publickey=ed25519%3A6eb6cb0f87776e40a8c2973da0bee060f9169c946be7f5ef9b94773e9bd2a0fc&datakey=79c05b4b67764ad99a7976a7d2fb1cfce4f196ea217ef0356af042cb5492bd5d
You can clearly distinguish the “publickey” and “datakey” parts in that URL:
- publickey:
ed25519%3A6eb6cb0f87776e40a8c2973da0bee060f9169c946be7f5ef9b94773e9bd2a0fc
datakey:
79c05b4b67764ad99a7976a7d2fb1cfce4f196ea217ef0356af042cb5492bd5d
Now, that we learned about “publickey” and “datakey”, we can form a skyns:// URI that we will need later. Just like a Skylink could be represented as sia://
skyns://ed25519%3A6eb6cb0f87776e40a8c2973da0bee060f9169c946be7f5ef9b94773e9bd2a0fc/79c05b4b67764ad99a7976a7d2fb1cfce4f196ea217ef0356af042cb5492bd5d
This notation of a registry entry will come in handy in just a moment.
Automating production release deployments with Handshake domains
Now that you’ve learned some basics about Skynet registry, we can proceed with the final step of our setup.
We can configure Deploy to Skynet action to update a registry entry with a new Skylink after each successful “main” branch deployment.
First, make sure that you are on a “main” branch and it’s up to date.
git checkout main
git pull
For the last time, we will edit “.github/workflows/deploy.yml” and configure a secret seed in Deploy to Skynet action:
— name: Deploy to Skynet
  uses: kwypchlo/deploy-to-skynet-action@main
  with:
    upload-dir: build
    github-token: ${{ secrets.GITHUB_TOKEN }}
    registry-seed: ${{ github.event_name == ‘push’ && github.ref == ‘refs/heads/main’ && secrets.REGISTRY_SEED || ‘’ }}
Just to explain the expression used for “registry-seed” — it first makes sure that the event that triggered the job is “push” and the branch that it’s running against is “main”, only then it should assign the value of REGISTRY_SEED secret as “registry-seed”.
Your full “.github/workflows/deploy.yml” file should look like this now:
name: Deploy to Skynet
on:
  pull_request:
  push:
    branches: [main]
jobs:
  build:
  runs-on: ubuntu-latest
steps:
  — uses: actions/checkout@v2
  — name: Use Node.js
    uses: actions/setup-node@v1
    with:
      node-version: 14.x
  - name: Install dependencies
    run: npm install
  - name: Run unit tests
    run: npm test
  - name: Build
    run: npm run build

  — name: Deploy to Skynet
    uses: kwypchlo/deploy-to-skynet-action@main
    with:
      upload-dir: build
      github-token: ${{ secrets.GITHUB_TOKEN }}
      registry-seed: ${{ github.event_name == ‘push’ && github.ref == ‘refs/heads/main’ && secrets.REGISTRY_SEED || ‘’ }}
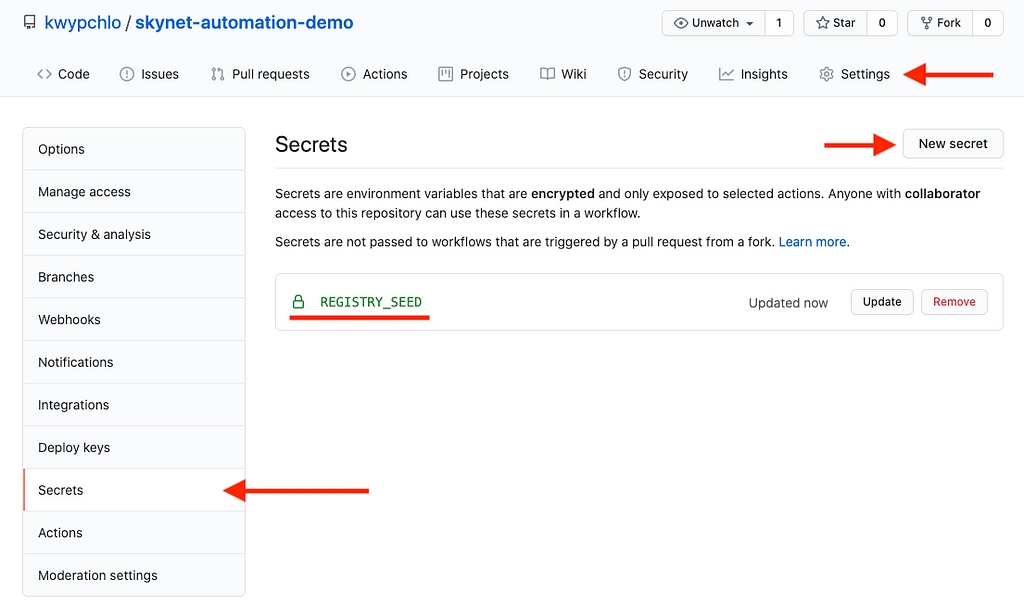
You will now need to go to your Github project settings and add a new secret called REGISTRY_SEED in the Secrets section. It has to be very secure and globally unique. You can use for example this website and pick one of the safe keys like “256-bit WEP Keys”.
Testing time!
Please commit and push your changes to the “main” branch.
git add .github/workflows/deploy.yml
git commit -m “assign registry-seed to update registry entry”
git push
A new workflow job will be triggered, please check the logs of Deploy to Skynet action once it succeeds. You should see a registry link in addition to the logs we were used to. This means that the registry entry has been created or updated and you can use this registry link to retrieve it.
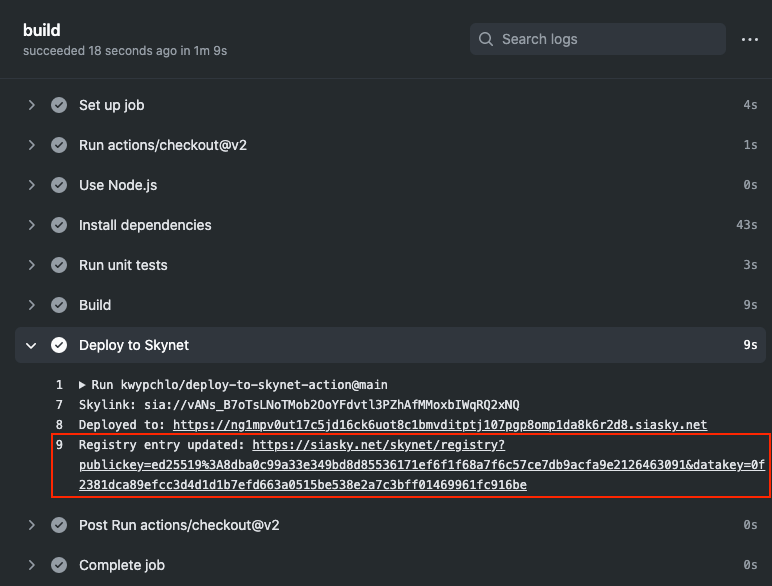
This is my specific registry link that we can use to retrieve the registry entry. You can open it up to get an idea of what it contains.
{
  “data”: “76414e735f42376f54734c4e6f544d6f62324f6f59466476746c33505a6841664d4d6f7862495771525132784e51”,
  “revision”: 0,
  “signature”: “0d0759cd0ec97b43b055e5d5052440b52e7236f2d84dccb573ff69e7da4f357b5e302794e6117c56034562ca3b383eba06a1beb2a714bc7aa8733a3de69ece0a”
}
The “data” key contains a hex-encoded Skylink that was just deployed. You can paste the “data” key-value into an online hex decoder to verify that.
What we can do now is form a skyns:// URI just like the one mentioned in the section above by extracting public key and datakey and putting them together as skyns://
Final URI should look like this:
skyns://ed25519%3A8dba0c99a33e349bd8d85536171ef6f1f68a7f6c57ce7db9acfa9e2126463091/0f2381dca89efcc3d4d1d1b7efd663a0515be538e2a7c3bff01469961fc916be
Now for the final part, you can go to your handshake domain configuration and replace what has been a static Skylink in the text entry, with our new skyns://
Once you verify that the domain has been synced, go ahead and change background color in your app and commit those changes to the “main” branch, push them and wait until the workflow succeeds. You should see the changes on https://my-example-webapp.hns.siasky.net immediately after! Now you can share that link with anyone and every time you push new changes, Deploy to Skynet action will take care of updating the registry for you and you will be able to enjoy almost instant updates to your app!
See it in action
You can check a live implementation of the above workflow in the Note to Self app’s Github repository. The repository is configured to:
- deploy to note-to-self.hns.siasky.net on every change to “main” branch
- deploy pull request previews (check an example pull request)
Complete Github workflow is available in build.yml.
— -
Thank you for reading through the article! If you have any questions, please reach out to us on Discord: https://discord.gg/sia
Happy hacking!
Automated deployments on Skynet was originally published in Sia Blog on Medium, where people are continuing the conversation by highlighting and responding to this story.
7
0
 Manage all your crypto, NFT and DeFi from one place
Securely connect the portfolio you’re using to start.